Did you know that you can create brand new rose bushes from a simple bouquet of roses? Not only is it possible, but it’s actually fun to try – and a lot easier to do than you might think!
Whether you are getting a bouquet of long-stem roses for a special holiday or anniversary, or as a simple “just because” gift, it’s always a bit sad to see the once-vibrant blooms fade away soon after receiving them. Once that occurs, the roses typically just get tossed in the trash bin.
But what if you had a chance to take those roses and turn them into a growing and thriving plant instead? You can actually attempt to do this quite easily by treating each stem as a cutting, and then rooting it to create a brand new plant!


Roses are one of the most timeless flowering perennials to grow. They add beauty, depth, and an amazing aroma wherever they are planted. While you can grow them from seed, the process is slow and can be a bit frustrating.
Instead, it’s much easier to grow new roses from cuttings. And what better way to do this than by turning your rose bouquet into the perfect vessel for creating new roots and growth!
How To Create A Rose Bush From A Bouquet Of Roses
*Please Note: As with all houseplants and flowers, ensure that the roses you are taking cuttings from are not patented. Some commercially sold roses have patents that prohibit individuals from propagating without a license.
Supplies Needed
Besides your bouquet of roses, there are a few other items you will need to gather together before starting. First, you will want a thick pair of gloves if your roses are particularly thorny. It’s never fun to work with roses only to end up with cuts all over your hands and arms!
Next, you need a pair of sharp, clean pruners or scissors. If the pruners have been used before, make sure to disinfect the blades before using. This helps to ensure that you don’t transfer any disease or bacteria from what was last pruned.

You will also need a small pairing knife or blade for cutting the base of each stem. This is important, as you will see in a moment, for creating an area for the stem to grow new roots.
In addition to the gloves, pruners and knife, you will have to source a growing container for your new rose. The container should have drainage holes to allow excess moisture from pooling at the base of the plant. If your container doesn’t have any drainage, be sure to add some prior to planting.
Now on to the soil! One of the most important ingredients for success is to use fertile, well-draining potting soil to grow your rose cuttings in. You can use your own homemade blend or a commercial potting soil, but whatever you choose, it needs to be lightweight and full of nutrients. (Affiliate Product Link: Espoma Organic Potting Soil)
A Few Optional But Helpful Items – How To Create A Rose Bush From A Bouquet Of Roses
Although it’s not necessary, another helpful item to have on hand when propagating cuttings is a good rooting powder. This product is added to the stem right before placing it in soil. It increases the likelihood of success and helps to speed up the process of rooting as well. (Affiliate Product Link: Bonide Bontone II Rooting Powder)
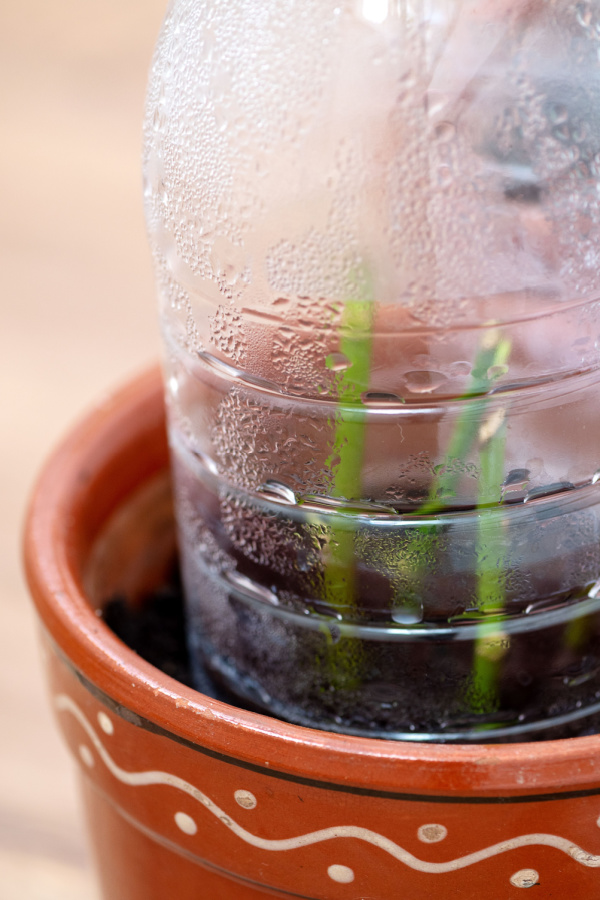
Another optional but extremely helpful tool is to have some sort of humidity dome for your rose cuttings. It doesn’t have to be fancy. A large resealable plastic bag or a plastic bottle will work well for this.
You can root roses without a dome, but having one will help to increase the moisture around the rose cutting – and, in the process, improve your chance of success. Now that you have everything you need – it’s time to try to root a rose or two from your bouquet!


Choosing The Right Stems – How To Create A Rose Bush From A Bouquet
One of the best parts of using a rose bouquet as the source for your cutting is that you can enjoy the life of the beautiful blooms right up until they fade. Once the blooms have started to wilt though, it’s time to make the cut!
It’s important to not wait too long after the rose bloom has started to wilt before propagating. You want the stem to be nice and healthy. If not, it is likely your cutting won’t survive to grow new roots.
Choose a stem that looks firm and has good coloring. There shouldn’t be any signs of rotting such as soft spots or darker areas along the stem. Brown coloring is a good indication that the stem has already started to fade.
Throughout the process of turning your bouquet of roses into cuttings, you will always want to keep the bottom of the stems moist. The best way to do this is to place them in a jar of water to prevent them from drying out as you work.
Making The Cuts To The Rose Stem
When making any cuts along the stem, cut at a 45º angle. Begin by cutting off the wilted bloom as well as the base of the stem. The bottom of each cutting should be made about one-half of an inch from a node. Nodes are the small bumps or nodules along a stem where a branch can grow from.

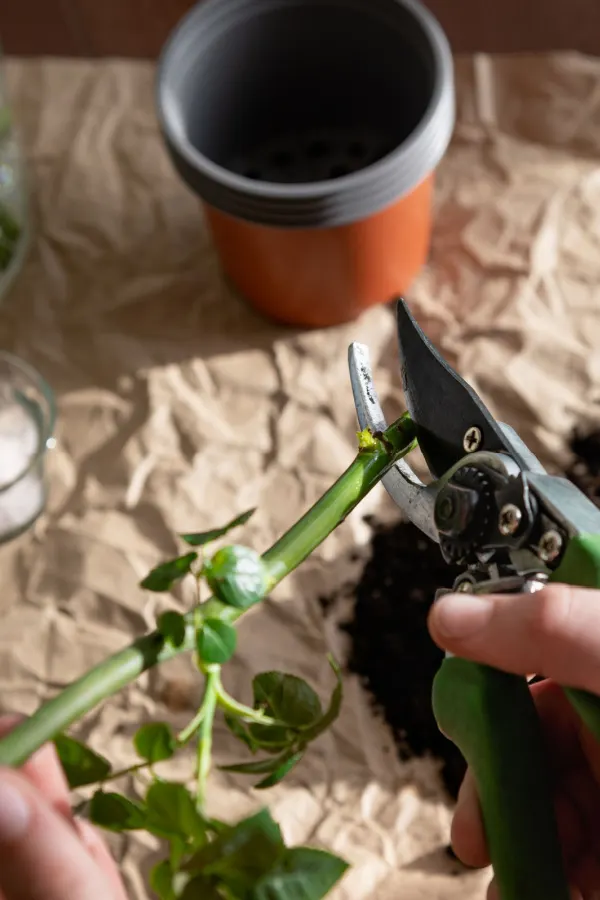
Next, cut each stem into 6 to 8-inch lengths. Ensure that each portion has at least 3 to 4 nodes. Depending on the length of your bouquet stems, you might be able to get a couple of cuttings per stem.
Remove all of the leaves on the lower portion of the stem. Only keep a couple of leaves at the top. Then, take a knife and carefully place a few shallow cuts vertically along the bottom inch or so of each cutting. Roses actually create new roots from wounds, so adding in a couple of cuts helps increase the likelihood that the rose will root.
Planting The Cutting – How To Create A Rose Bush From A Bouquet
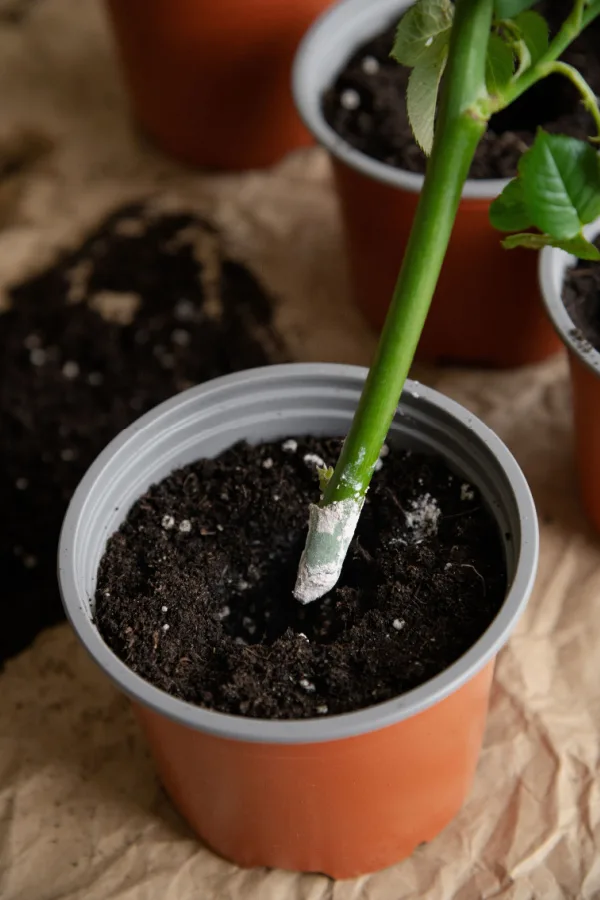
Once the stems are cut and ready to go, dip the bottom of the stem into a glass of water. Then, immediately dip it into your rooting powder. Make sure to get the part of the stem that you cut covered in the powder. Finally, shake off any excess powder that remains on the stem.
The cutting is now ready for planting. Create a small hole in the potting medium that is slightly larger than the width of the stem. Using a pencil makes quick and easy work of this task.
You want the hole to be big enough so you can slide the stem into the soil without the rooting powder getting wiped off in the process. Ensure that the hole is deep enough so that at least two nodes are covered in soil. Once planted, lightly tamp the soil around the stem and water thoroughly.

This is where a humidity cover (dome) of some sort over your rose cutting can help to encourage quicker rooting. You can make a simple homemade humidity dome with a resealable bag or bottle with the end cut off. Just place it over the top of the plant and attach it to the container to hold moisture in.
Getting Your Cutting To Root – How To Create A Rose Bush From A Bouquet
Keep the rose in a spot that receives plenty of indirect sunlight. If the temperatures allow and are warm enough, you can move the rose to a covered porch or other protected outdoor location.
About twice a week, remove the plastic covering and check the soil. Only water to keep the soil from completely drying out. This might happen quicker if you aren’t using a humidity cover. While the cover is off, also remove any brown or dead leaves.
Patience, Patience, Patience!
Now it’s time to be patient. It can take up to a couple of months for a rose to take root. Watch for new leaf growth or for signs of rooting such as seeing roots growing out of the drainage holes. When this occurs, you can then remove the humidity cover.
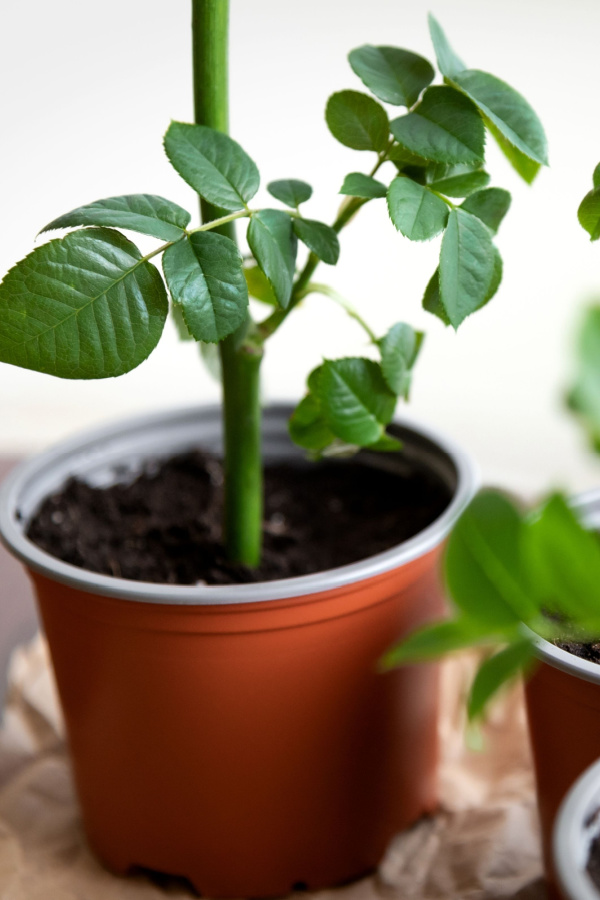

If you have more than one cut rooting in the same container, repot them so they each have their own container. Remove any stems that have started to brown at the base. This is an indication that the cutting has started to rot.
Allow your cutting several months before planting it out in your garden. Even better, if you can wait up to a year it will give your cutting an even better chance of handling the transplanting stress. You can either directly plant the stem into the soil or into a large container.
You can now enjoy your brand new rose bush made with cuttings from a beautiful bouquet of roses! To learn more about how to care for mature rose bushes, also be sure to check out “Summer Rose Care – How To Deadhead And Fertilize Roses”
Simple Garden Life
Follow Our Facebook Page For Even More Great Tips! Simple Garden Life Facebook Page
Simple Garden Life is a website dedicated to keeping gardening fun, simple and enjoyable! We publish two new articles each week along with a new garden podcast episode every two weeks. This article may contain affiliate links.